Thunderbird amp identification help

Default

Super Moderator
Platinum Supporting
Joined
Jul 30, 2007
Messages
13,632
Reaction score
3,060
Location
Philly, or thereabouts
Guild Total
11
Huh, wonder why the pics aren't coming up in the post?

What tubes does it use for outputs?
7591's or 6L6's?
 
Joined
Apr 23, 2008
Messages
7
Reaction score
0
Location
Reston VA
I changed the photo attempt to a link to a Kodak Gallery album of 3 photos. One of them is a closeup of the inside back, and the "preamp tube location chart" there indicates one 6GW8 and five 12AX7 tubes.
 

Default

Super Moderator
Platinum Supporting
Joined
Jul 30, 2007
Messages
13,632
Reaction score
3,060
Location
Philly, or thereabouts
Guild Total
11
DC Dan said:
I changed the photo attempt to a link to a Kodak Gallery album of 3 photos. One of them is a closeup of the inside back, and the "preamp tube location chart" there indicates one 6GW8 and five 12AX7 tubes.

Those are the preamp tubes. The 6gw8 is the reverb driver tube and it's two dissimilar tubes in one, getting to be scarce. It's a two chassis amp.

In the bottom of the amp, to the left is the power section. If you take off the back panel, you'll see it screwed to the side of the cabinet. The power tubes are located there.
 

matsickma

Senior Member
Joined
Jun 21, 2005
Messages
4,293
Reaction score
1,047
Location
Coopersburg, PA
Hi DC Dan,

Your the owner of a 2nd version of the Thunderbird Amp that was available from 1968 to mid to late 1969. It uses a pair of 7591A power tubes and has a pair of 12 inch speakers. Typically the speakers are excellent sounding Concerto Jensen speakers. In my opnion this is the best sounding of the Thunderbird amps and they all sound quite good.

M
 

Default

Super Moderator
Platinum Supporting
Joined
Jul 30, 2007
Messages
13,632
Reaction score
3,060
Location
Philly, or thereabouts
Guild Total
11
See? I do middle relief until the closer comes in!

I heartily recommend JJ 7591's. They're inexpensive and sound great!
 
Joined
Apr 23, 2008
Messages
7
Reaction score
0
Location
Reston VA
Thanks! I took the back off, and found just what you said I would. I added more photos to the Kodak gallery of the insides. I also found a 1968 ad with this amp in it, featuring George Benson, and put that in the gallery as well.

I've had this in storage for many years. The amp does sound pretty good, although I'm sure it could use work on capacitors and more. The reverb is dead, maybe the 6GW8 tube?

I'm in the Washington, DC, area, are there recommendations for repair people anyone has used?

Thanks for all your expertise...
 

capnjuan

Gone But Not Forgotten
Joined
Nov 29, 2006
Messages
12,952
Reaction score
4
Location
FL
DC Dan said:
....The reverb is dead, maybe the 6GW8 tube? ..
Hi DC Dan and welcome. Considering all the itty bitty things that go into making the reverb work, if it's just the 6GW8, you'll be fortunate. Good luck! John
 

capnjuan

Gone But Not Forgotten
Joined
Nov 29, 2006
Messages
12,952
Reaction score
4
Location
FL
Okay ... but should he hit it on the right side or the left?
 

matsickma

Senior Member
Joined
Jun 21, 2005
Messages
4,293
Reaction score
1,047
Location
Coopersburg, PA
Where it is spanked shouldn't matter. The Reverb tray is mounted up inside the preamp "head' and is pretty sensitive in that location.

M
 

capnjuan

Gone But Not Forgotten
Joined
Nov 29, 2006
Messages
12,952
Reaction score
4
Location
FL
Hi DC Dan: M is right; you can smack your T-bird wherever you want; might or might not work depending on what ails it. I have a schematic for your amp; PM or email if you or your tech want it. Amps are a little like cars in that each of us can do as much or little as we have the skills or time for. The problem with your reverb section may or may not be something you can fix or it could be something that you're not interested in messing with yourself anyway.

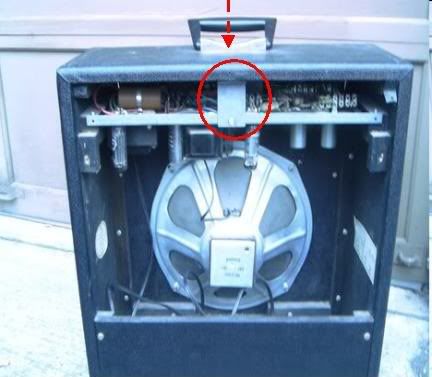
Shown below are both the schematic of the reverb section of the amp and a pic of your amp:

Slide1-2.jpg


The green arrow ties together the reverb transformer on your schematic and in your amp. The yellow box and arrows represent both the schematic and real reverb 'pan' or 'tray'. The red lines and circles are the connections in and out of the reverb tray. The reverb tray has small transducers - enclosed in the red circles - that convert the inbound electrical signal to mechanical vibrations and then back to an electrical signal on exit from the tray. The transducers cannot be repaired; if they are damaged, the tray will have to be replaced.

The pic below is the signal path of the reverb section; also shown are some items you can address if you choose:

Slide3-1.jpg


As an aside, this amp represents a departure by Guild from speaker-driven reverb. Several predecessor models fed the reverb can from the primary speaker; notably the first generation Thunder 1 RVTs and the Thunderbird (V1). In your amp, the signal is taken from the line section and fed to the first stage of the 6GW8 (V4A on the schematic). The signal is amplified and then sent to the reverb transformer whose function is impedance-matching. Tubes including the 6GW8 have high internal impedance; the tray has low internal impedance - the transformer allows the two to be connected; in the same manner as speakers to output tubes.

The signal is converted, and then back again, by the transducers from an electrical, to a mechanical, and back to an electrical signal. At the output of the reverb tray is a ground leg with a switch in it (blue circle on left); this is the reverb button switch in your footswitch. The switch opens and closes a path to ground. Your amp always produces a reverb signal but if the switch is in the off/closed position, the reverb tray output is grounded. You ought to consider opening the footswitch box and bathing both switch bodies in contact cleaner and operating both buttons several times. If the contacts are dirty, even if everything including the 6GW8 is working correctly, the crud on the switch can shunt your signal to ground .... no boingy boingy boingy even though everything is ok.

The signal is recovered and amplified by the other 1/2 of the 6GW8 (V4B). From there it travels to a pot which is something, if you choose, you can work with; this pot and every other one on the control panel will benefit from spraying them with lubricating-type contact cleaner. You can have a perfectly good reverb section but if the pot is dirty, you won't get a signal. Spray liberally into the opening among the three little legs; if you're worried about getting zapped with high voltage which is present in certain areas of the amp, put your other hand in your pocket. Spin the pots back and forth a few times; when turned slowly, you should feel a slight vibration and a little drag. Finally, gently wiggle and tug the 6GW8 out of its socket; if there's any resistance at all, spray some contact cleaner on it and try again ... gently. If/when it comes free, spray some more cleaner in the socket and insert/remove several times allowing the friction between the pins and sockets to scrape the corrosion off.

It's also possible that the electrical supply to the 6GW8 is off or other purely electronic problems - wth, it could be anything - but if the reverb was working when the amp was last shut off, then the chances are the problem isn't the 6GW8. Everybody has a different threshold for how much of this stuff they are willing to mess with but the control pots, the footswitch, and the pin/socket of the 6GW8 are as strong, or stronger, reasons than the 6GW8 for no reverb output.

Even if you do these items and the reverb doesn't improve, your amp will perform better and you will have ruled out common maintenance as the source of the problem. If it does improve, then you will have saved humping the amp to and from a tech including an open-ended exposure on bench fees ... including paying him to spray cleaner around the amp. Good luck with your amp! John
 
Joined
Apr 23, 2008
Messages
7
Reaction score
0
Location
Reston VA
Thanks for all the info! I don't have a tech yet - I know of some Fender and Marshall techs locally, but not Guild. Capnjuan, I will email for the schematic and do what I can on my own- this group is excellent, I'm going to dive in & see how far I get!
 

capnjuan

Gone But Not Forgotten
Joined
Nov 29, 2006
Messages
12,952
Reaction score
4
Location
FL
Hi Dan: email sent w/ schematic. This is the stuff most people use to clean pots, switches, cable jacks/plugs, tube sockets/pins, and so on: CAIG DeOxit. Can be bought at Guitar Center and all over the web. Sold as two types; cleaner and conditioner - sometimes as 'blue' and 'red'. You need to use both on moving contacts like pots and slide switches so there's a film of lubricant on the moving parts. Finally, no matter what happens in the near-term w/ your reverb, consider scoring another 6GW8 anyway. The 6GW8 is no longer in production and available only as NOS/new old stock or used and their price is going up: LTG 6GW8 thread. Fresh tubes always help and if your current 6GW8 works, you can save it as a known good backup. If you have reverb headaches in the future, you can substitute your known good tube to confirm the operating condition of whatever you have in the amp.

Price check for 6GW8s:
http://thetubestore.com/nos-6gw8.html
http://search.store.yahoo.com/cgi-bin/n ... earch.html
https://www.tubeworld.com/index_high.htm (type 6GW8 in the search window and scroll down)

Good luck! John
 
Joined
Apr 23, 2008
Messages
7
Reaction score
0
Location
Reston VA
I finally got around to continuing this project - a new job and other things got in the way. The reverb was shorted out in the footswitch, where a standard electrical twist connector had come off. I also pulled all the tubes, no corrosion. Used DeoxIT all around, and everything works fine. MANY THANKS to all who helped out, particularly Capnjuan!

The only remaining problem is a hum that gets noticeable when the master volume control is more than a quarter of the way up. It's the kind of hum I lived with in bands in my youth, but would be good to eliminate. I'll be experimenting with the "hum balance" control on the back soon, and will search this forum for hum advice. I've got another amp with a noise gate in the circuit, setting the threshold right at the hum level cleans it up perfectly for recording, wish this had the same.

Happy New Year all!
 

capnjuan

Gone But Not Forgotten
Joined
Nov 29, 2006
Messages
12,952
Reaction score
4
Location
FL
Hey Dan; welcome back ... long time no post! Considering how many things can mess up reverb, I sort of thought it might not be the tube; they are more reliable than most people think. Humdee Dumdee ... the acne of musical electronics. If bumping the hum balance pot back and forth doesn't fix the problem and if the amp hasn't had new power supply filter caps in the recent past, the chances are than one or more of them is beginning to leak DC to chassis ground. Since chassis ground is shared by the audio/AC circuit, any DC found there by the AC signal will be picked up and .... yes, amplified!

Is your amp like the one in this thread? If yes, the electrolytic filter caps - the aluminum and sometimes black cardboard cylinders - are mounted on the lower chassis. If your amp doesn't already have a 3-wire cord, getting one put on for safety's sake when the caps are replaced ought to be considered. There are two other small capacitors ID'd in this thread that you should also think about having removed when the new cord is put on it. There are lots of sources of hum but the power supply filter caps is the place to start.

I don't fully understand what your 'noise gate' does other than to say that pronounced hum in a tube amp is a sign of something wrong. I guess it's possible that an amp mfr could make an amp so noisy that it needed a built-in function to suppress it but ... who knows. The only other comment I have is that, if after replacing the filter caps, you still have a noticeable hum that is tied to the Master volume, there's a chance that the interstage coupling cap ahead of the MV is starting to leak DC but your tech ought to be able to correct it before it comes off the bench.

Welcome back and Happy New Year! CJ
 
Joined
Apr 23, 2008
Messages
7
Reaction score
0
Location
Reston VA
Hi CJ,

This is the amp:
Tbird002.jpg


The hum balance pot changes the hum from treble to bass, but doesn't lessen it. I did remove the "line polarity" switch and install a grounded power cord. The hum is about the same with the proper grounding, I was hoping that might help. The polarity switch and the cap that grounded it (with yellow, red, & blue stripes) are in the upper right of the last photo below, all of which were taken before any work was done.

I was at an electric jam a few days ago and the amps there were all humming. This amp isn't really worse, but I'd like it better. My amp with a noise gate is a Carvin bass amp - set the threshold off and it makes a normal "presence" mild hiss/hum sound, but turn it up just a bit and the gate shuts, absolutely dead silent. Play a note and it's instantly on, no problems. Good in the studio.

I have so little time now that I may not get around to the cap job anytime soon. And the amp is too big for my uses these days, too heavy for my aging body to lug around... :-(
I guess I'd be open to selling it, but don't have a clue what it's worth or how I'd ship it.

Best, Dan


Tbird003.jpg

Tbird006.jpg

Tbird004.jpg

Tbird009.jpg
 

capnjuan

Gone But Not Forgotten
Joined
Nov 29, 2006
Messages
12,952
Reaction score
4
Location
FL
DC Dan said:
The hum balance pot changes the hum from treble to bass, but doesn't lessen it. Hi Dan: all the hum balance does is adjust the distribution of AC in the filament circuit. If there is DC being leaked to the chassis and picked up by the audio circuit, as you've discovered, the hum balance pot won't help. I was at an electric jam a few days ago and the amps there were all humming. This amp isn't really worse, but I'd like it better. Yes, hum is the BO of tube amps; some have it worse than others. My amp with a noise gate is a Carvin bass amp - set the threshold off and it makes a normal "presence" mild hiss/hum sound, but turn it up just a bit and the gate shuts, absolutely dead silent. Play a note and it's instantly on, no problems. Good in the studio. Ok. And the amp is too big for my uses these days, too heavy for my aging body to lug around ... I can relate; I had a '80-'82 Fender 75 ... the 75 refers not only to watts but to pounds; one pound per watt ... what fearful symmetry ... I guess I'd be open to selling it, but don't have a clue what it's worth or how I'd ship it.
It's a shame that more manufacturers didn't adopt Fender's doghouse; a metal enclosure on the transformer deck under which all the power and bias supply caps sit lined up on a phenolic board. Leo Fender, whatever his quirks, realized that as voltages increased, so would the wear on the filter caps so he put them somewhere musicians/techs could get at them.

Snip the old ones out, solder the new ones in; recapping a Twin, Super, whatever would take a fraction of the time compared to amps like this Guild where, for purchasing and assembly economics, they relied on can caps ... a problem made more acute when the electronics industry drifted away from high voltage / low current vacuum tube technology towards low voltage / high current transistors. [end of rant] In any event, finding the right replacement caps is difficult and humping the amp ... as the expression used to go; "I grok your meaning". The parts for a complete cap job would be in the low $100s ... and I don't have a clue about how to ship it either. Good luck! CJ
 
Joined
Apr 23, 2008
Messages
7
Reaction score
0
Location
Reston VA
I borrowed Gerald Weber's videos on amp rebuilding, and yes, the Fender cap job is so convenient... He looks at several makes, but no Guild.

I used his example for rewiring to a 3-prong plug, and he has a speaker cone repair technique (single-ply paper towel on both sides with a gob of Elmer's glue on each, rolled out to smooth with a chopstick, then flat black spray paint when dry - cool!).

I'm getting a new washing machine delivered soon by a company that specializes in moving large/heavy things, maybe I'll ask them about how to ship an amp...

Thanks, Dan
 

capnjuan

Gone But Not Forgotten
Joined
Nov 29, 2006
Messages
12,952
Reaction score
4
Location
FL
Hi Dan; I've used Weber's cone fix too but I used light-weight medium-gray construction paper; got a good result and was able to save a squirt or two of spray paint ... more to go tagging with ... I know what you mean about the moving company ... maybe you could get them to take it away ... that or tell them to bring the washing machine's packing box with them.

One other thought ... don't know if you have anyone within reasonable range who could do the work but you might consider taking the lower chassis out and taking it to a shop. The big supply caps are on the lower chassis. When finished, you could take him the upper chassis where the 3- or 4-section reverb can cap lives ... swap chassis and go back and get the upper. The chance of catastrophic failure isn't any lower at the shop than it would be at your house. It's less weight lifting for you and the shop.
 
Top