powerwagonjohn
Member
- Joined
- Mar 9, 2011
- Messages
- 585
- Reaction score
- 97
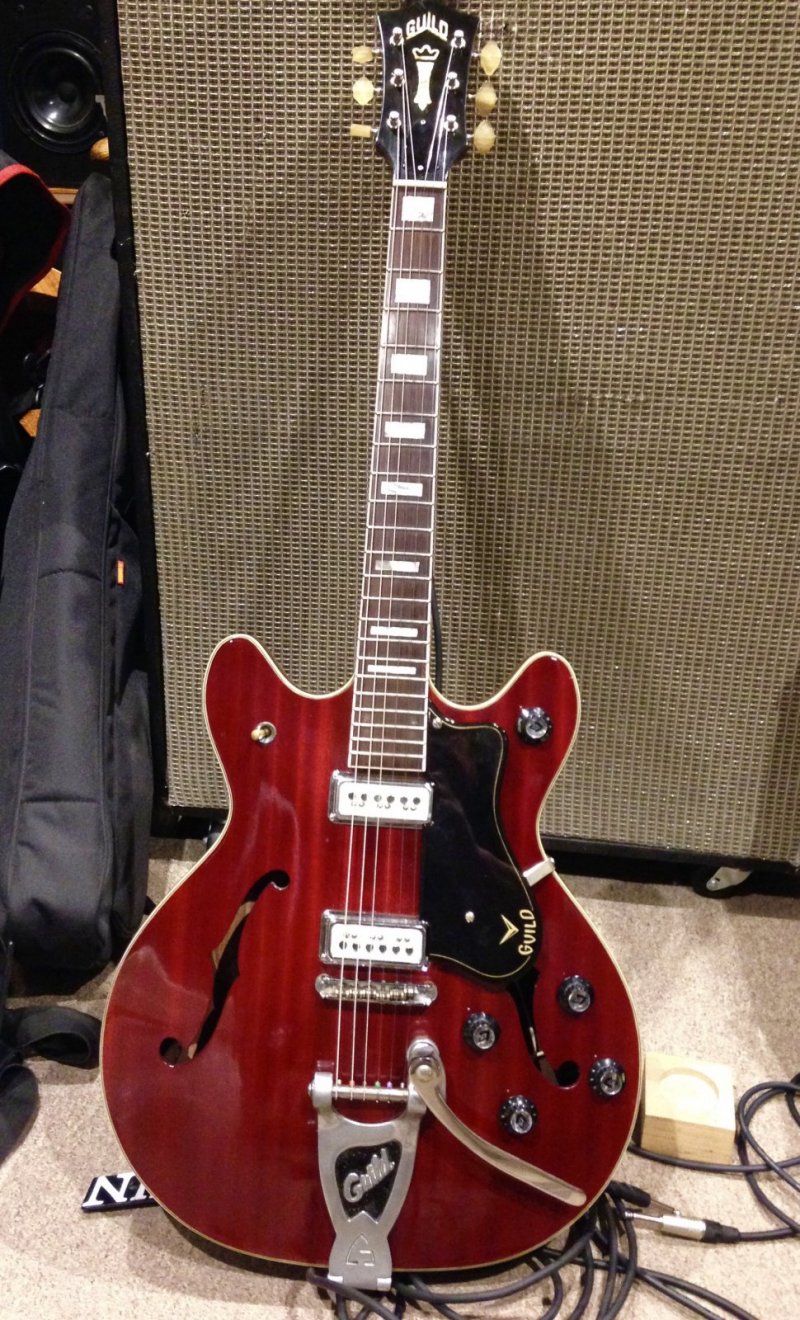
My 1973 Starfire IV has a mahogany body and a mahogany center block.
Thanks John
Thanks John
Excalibur! What a prize. Congratulations!I picked this up earlier today from @twocorgis. Really nice meeting a fellow LTGer and he was great to deal with!
I have been keeping my eyes open for a Starfire IV with factory DeArmonds for a while and have never seen another one for sale. It definitely has been played and has dents, dings, and buckle rash. The previous owner also put a strap pin on the upper horn at one time and one of the tuners were replaced with another brand that left extra mounting holes. I will address the strap pin area on the horn and the extra holes in the headstock but leave the normal play wear as that’s the history of the guitar. The pickguard is also broken and the bridge is not original. I have original spares of these items in my parts box so I will swap those out. I will post “after” pics once I complete this work.
The guitar plays really well (Sandy had his luthier set it up) and it has a nice feeling neck. The nut width is between a 1 5/8” and 1 11/16” and the neck does not feel fat but also does not feel skinny. This is also the lightest Starfire IV I own. I was curious, since it felt so light, and I put it on the scale. 7.2lbs! Here are some photos:

The Bert was also short scale, neck join at fret 16 (***see Hans correction below - short neck, not scale!) Thanks Hans!The Bert Weedon was indeed hollow bodied.
Don't confuse a short neck with a short scale! The earlier 16th fret to the body Starfires and Bert Weedon models have the same scale length as the later ones with the neck joint at the 18th fret!The Bert was also short scale, neck join at fret 16


Thanks! It is a pain to correct any scars that have been there for decades and the raw wood has been exposed to dirt and such. Especially on a transparent finish! @twocorgis was 100% transparent on every scar and bump so I knew exactly what I was getting into. Here are two photos he sent me before I purchased the guitar to highlight some scars.As usual, an excellent job, Brad. Can't wait to see the finished results!


Nitro lacquer. Takes forever as it gasses off so much. Many dropsVery nice Brad! Much betterer. Drop full with thin superglue or something else?
I am just glad you saved it from that pawn shop in Louisiana, sight unseen, and then passed it along!Wow, looks a ton better Brad! I'm really glad this guitar ended up in the right home.
Ha, I've been taking in strays ever since I joined here!I am just glad you saved it from that pawn shop in Louisiana, sight unseen, and then passed it along!
What a noble soul!I've been taking in strays
Well, there are some guitars that need to be assimilated here, and this was definitely one of them. I bought it knowing that I wasn't going to keep it, but it was too special to be left with the "unwashed masses". LOLSavior of wayward Guilds


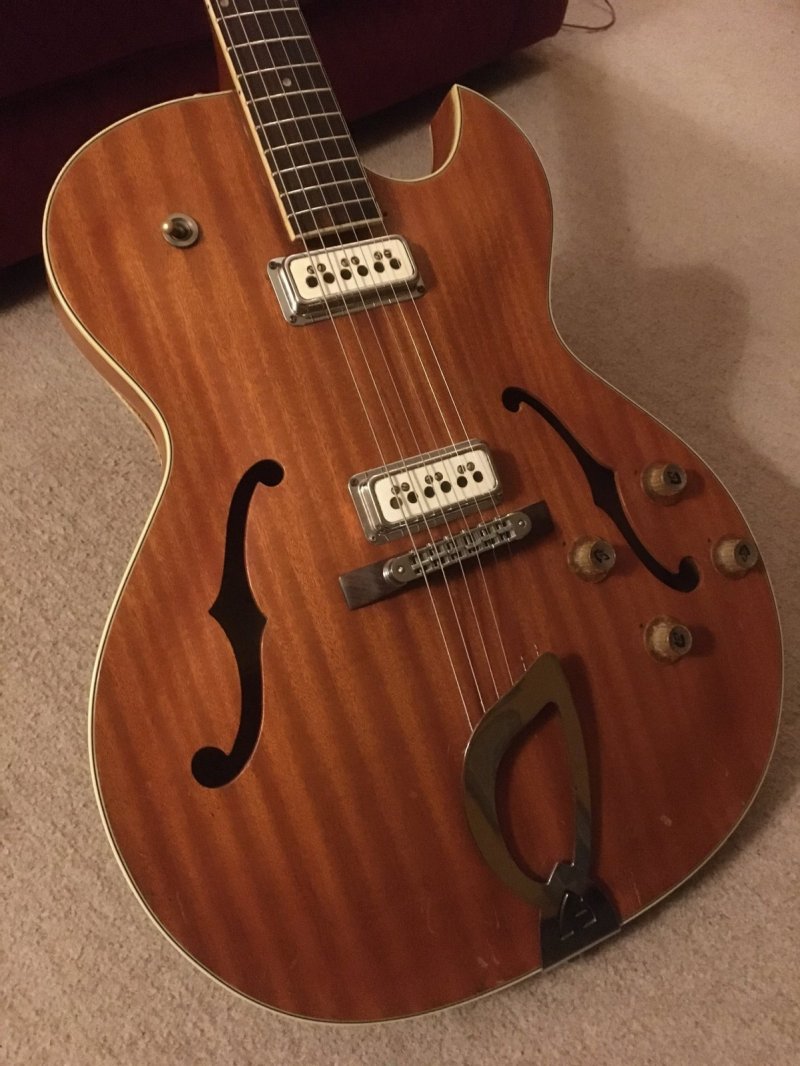
Great stuff Brad! @hansmoust might be able to help you with some of the parts you're looking for. It's certainly worth asking him.I should have everything finished either tonight or tomorrow but I wanted to provide a couple updates on items that needed to be resolved so my “finished” post isn’t too long. The first is about the pickups. Somebody played this guitar a TON and you can see the wear on the white top of the pickups. Mainly the neck pickup. This pickup also had a couple issues. The first is that the white body of the DeArmond is held to the chrome trim by some type of black glue on each end. I have seen red also but these are black. The glue line had broken on one side but not the other. This would allow that side of the pickup to sink inside the chrome trim ring if you applied any pressure to the white top. I used some ”IC-2000 Rubber-toughened CA Adhesive Glue” (black super glue) and that worked perfect to put a bead right on top of the original black glue bead. It matched perfect and you can’t even tell it has been reglued.
The second item was a little more tricky. From the original photos, from before I purchased the guitar, one of the pole piece magnets just did not look right. I thought it could be a reflection but my suspicion was that the retainer ring that holds in the magnet and allows you to move it up and down by the screw had broken and the magnet had been replaced. I have seen this on a few vintage DeArmonds. That “ring” around the magnet breaks in one spot and won’t tightly hold the magnet. The screw no longer adjust the pole piece and the magnet can fall out. When I first saw the guitar my suspicion was confirmed as the top of that magnet was flat and not beveled like the others. When I pulled everything apart it was further confirmed as that magnet was also very short and could not even reach the adjustment ring. I measured the size of the original magnets and sourced an alnico 5 magnet. I cut to length and hand beveled the top to match the original magnets. The diameter is just a fraction larger than the original so it fits tighter in the ring, while stile being able to move smooth up and down in the pickup. It now looks and works correct. The most important thing is that it sounds great and you can’t tell that the magnet is new. However, I would love to find an original magnet. If anybody has one or knows where to source one please let me know! Here is a photo. You can tell which magnet is new as it is shiny. Look at all of that wear on that pickup! Somebody loved playing this guitar.
While I had the pickups out I thought I would share a photo of the ring Guild used to install DeArmonds in this guitar. It is a one piece ring with the bridge ring being taller and angled to line up with the strings. The underside is beveled out to make room for the pickup flange. Rubber tubing was used on mine to allow for height adjustment like a tele bridge pickup. Not sure if the rubber was what was used originally but given how hard and dried out they were they could have been from 1970! I replaced all rubber tubing and now they can be adjusted up and down. Here is a photo of the pickup ring from the underside
That’s all for now but I will provide another update before the “after” photos.