zplay said:
bazooka47 said:
I have removed the neck on my CV-2C several times, using a 5/32 (if I recall correctly) ball-end allen wrench. It takes a little patience, especially if you have larger marfanoid hands like me.
With a small amount of careful neck heel sanding, I have gotten the action on mine within acceptable limits, but still not what I like. It may take some more extensive work to get this guitar playing correctly.
Otherwise, the CV-2c IS A GEM.
FINALLY, word comes that this can be done!! :shock:
Thanks so much, bazooka!
Could you provide a bit more detail, such as how much resistance you met in disengaging the neck? Also, just how you went about sanding the heel and if you were looking to increase the downward angle of the neck to the body or what?
And I fully agree with your last statement.
Well, here is what I did: CAUTION- it's easy to mess up a good guitar doing this kind of work on it, and I'm pretty sure it voids the warranty as well. Why did I undertake it, you ask? I really use this guitar for live playing (LOVE the way it sounds through the DTAR system), didn't want to ship it away for weeks or months as there are no Guild warranty repair centers nearby, and I try to do all my own maintenance work and setups.
Plus something tells me FMIC is not that motivated to do a recall/redesign on a discontinued model. SO, what are they gonna do- send me ANOTHER funky neck to bolt on?
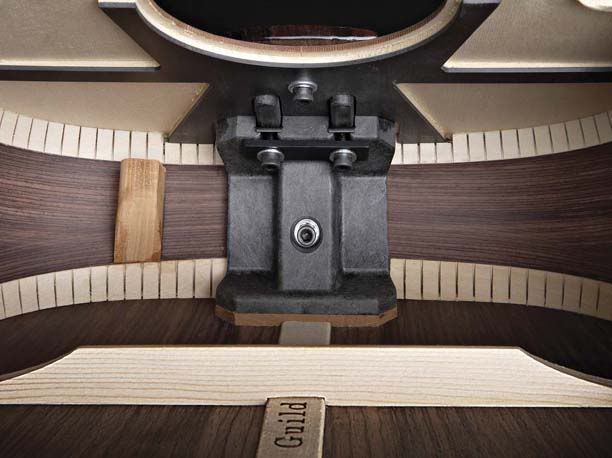
There are 4 round head hex bolts that hold the neck on; one that goes through the neck block and into the heel, and three that attach the fingerboard to the top. Of the three "top" bolts, one is centered near the end of the fingerboard, and the other two secure a simple 1" metal bracket that is located AROUND, say, the 18th fret (don't have the guitar here with me). Looking in the soundhole, one can see the head of the bolt that attaches the heel to the neck block. The other three must be removed by "feel".
The fretboard extension has a graphite plate into which are embedded the threaded inserts.
Once the bolts are out, the neck comes off as easy as a Telecaster (at least it does on mine).
My purpose in sanding the heel was to put a little back angle on the neck. The problem with the factory setup as I saw it was the neck was angle was too forward, similar to an older guitar that needs a neck reset. The way I did it was to use strips of 220 grit, to which I applied some packing tape to the back so that sandpaper itself would not tear. With the neck held in place by hand pressure, the tape-backed sandpaper is pulled through the neck joint, 1 or 2 "pulls" at a time. This technique is widely used for neck resets and is illustrated (albeit with a Collings) here:
http://www.frets.com/FRETSPages/Luthier ... eset11.jpg
One thing I noticed is that the "top" bolts cannot be over tightened (especially the two that sit in tandem securing the bracket), without causing a pronounced hump in the fretboard extension.
Mine is still not perfect, and I may have to end up pulling the last 10 or so frets and planing the board. Your mileage may vary.

")