1965 Starfire VI Reclamation Project

Jahn

Senior Member
Joined
Feb 1, 2007
Messages
1,932
Reaction score
64
Location
NYC
viewtopic.php?f=11&t=24053&start=45

That thread gave me a bit of hope that I could make this happen. given, I solder like i have two left feet on my wrists, and Dan Erlewine's book on guitar repair is the only resource I have other than the thread above to actually know what's what for wiring and such. But what the heck.

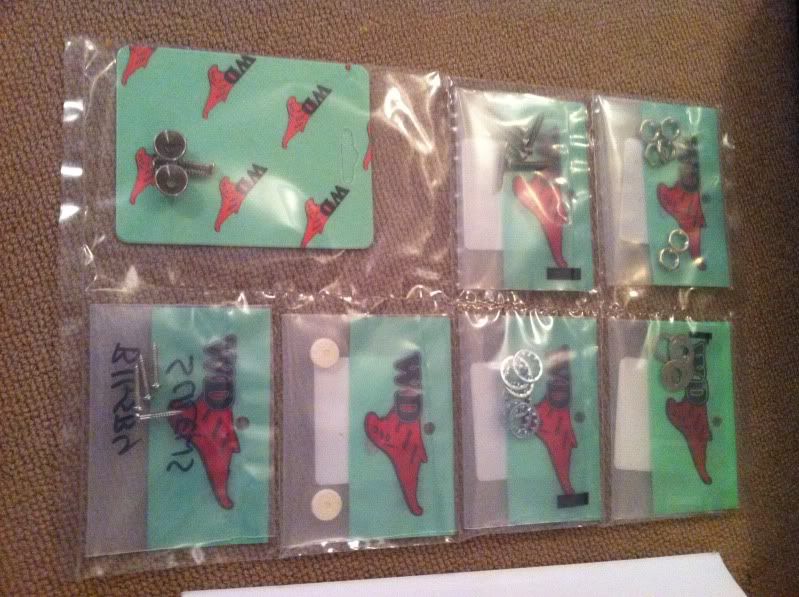
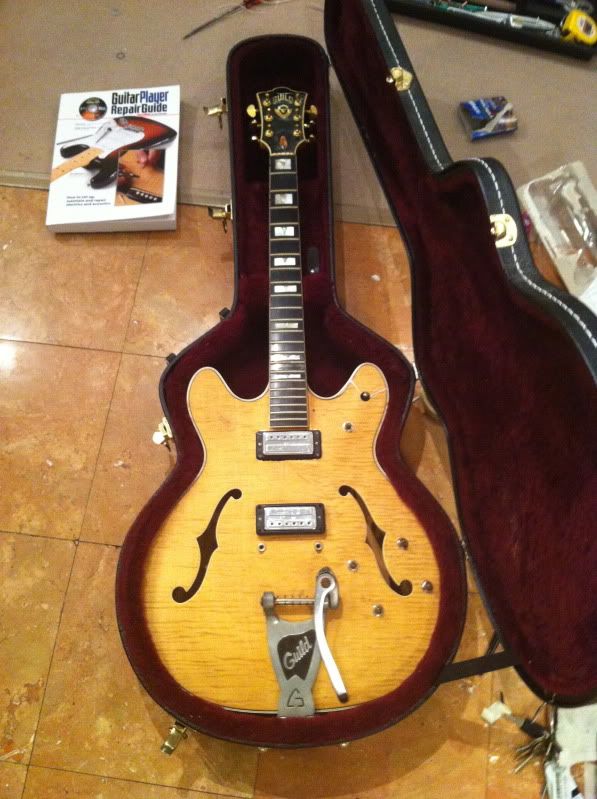
I sourced as much as I could think of before the guitar got here, and once the guitar got here, I figured out more that I needed. Still need a spring for the Bigsby, knurled nut for the selector switch, and the correct pickup adjustment screws for the bridge pickup, and mounting screws for the bridge pickup ring.

I found out that the bridge studs are sized for a nashville bridge. YUK. Really considering pulling those studs since they aren't original anyhow, and sourcing a decent Bigsby bridge. Either that, or see if Tru-Arc makes a bar bridge that can sit on nashville studs.

i can't make head or tails on how these locking grover rotomatics are supposed to work, so i think i'll source some old nickel grovers and call it a day. the pickguard l-shaped mounting bracket is not here either, i'll have to source something that'll work.

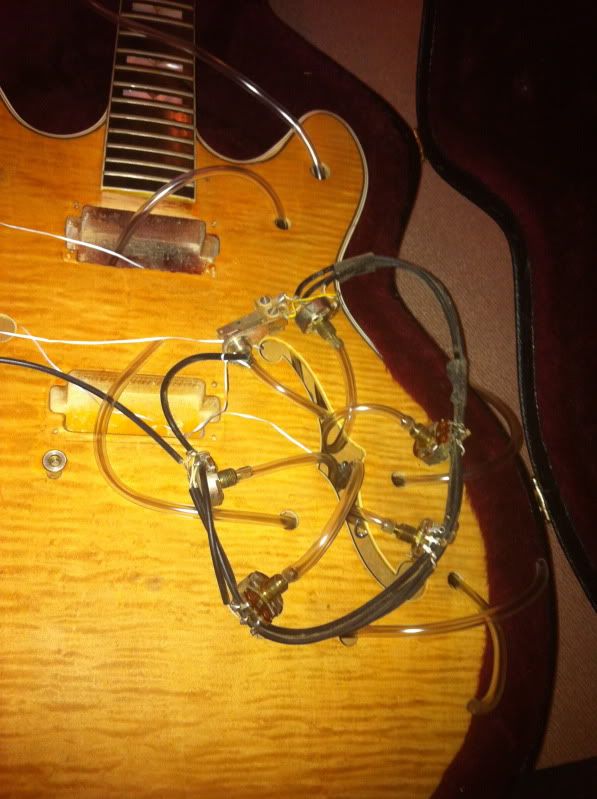
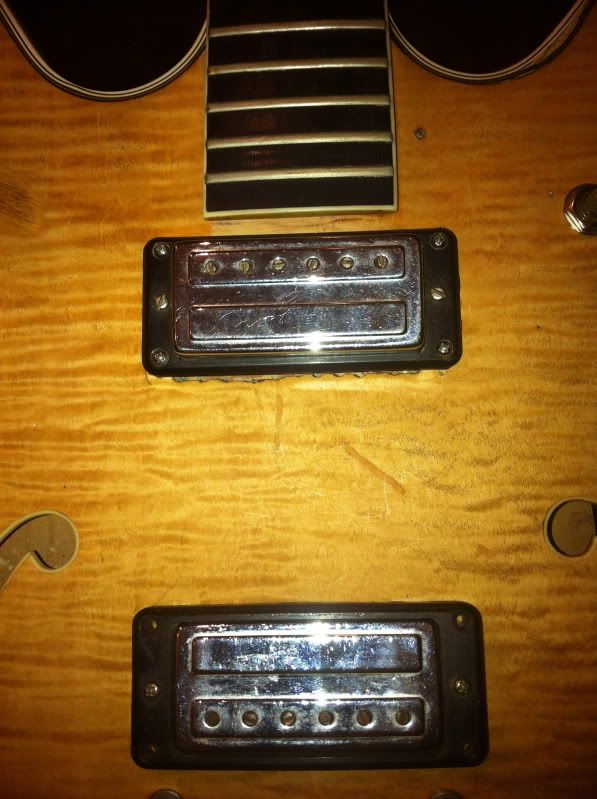
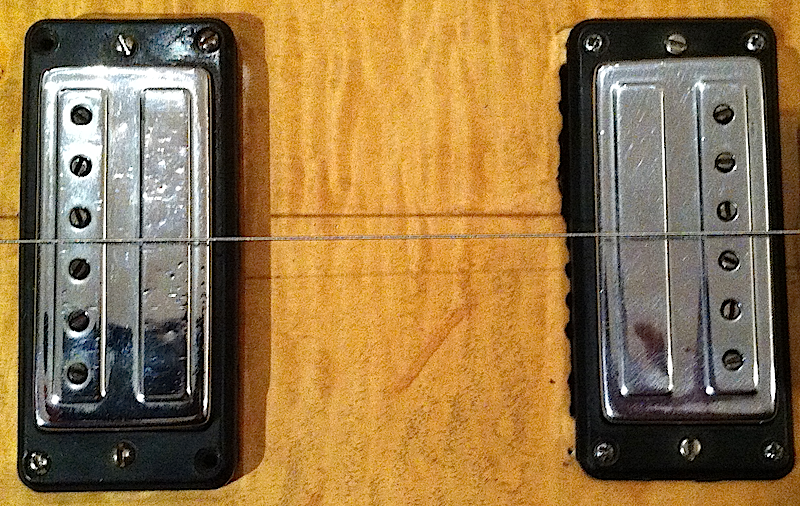
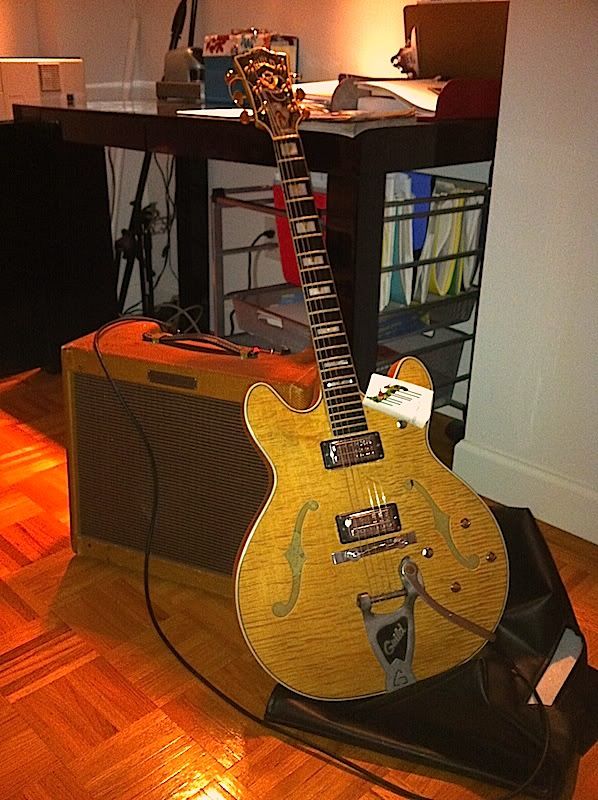
how come i seem a bit nonchalant about getting the perfect parts? because i found out that the neck pickup pocket has been routed on the south wall, probably an attempt to fit a large humbucker in there. gross thing is that once you mount the mini HB-1 in there, even with the ring you see the ugly uneven route. kinda woulda been a dealbreaker if i knew, but hey since it's here and i already put in a evening (or morning, it's 3 AM here now) putting together the Starfire will all given and bought parts, I'll just see it through and have this be my beater.

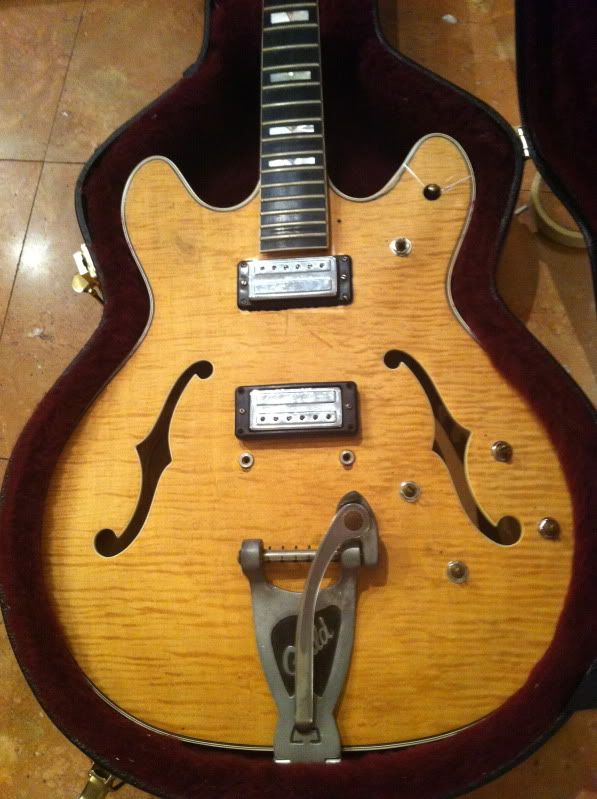
Speaking of beat, the finish isn't worn - it feels like it was stripped. The neck finish too, like it's raw wood. Only some finish left on the back hints at either a halted refin attempt or maybe the amber was the undercoat spray for the original factory sunburst. Again, not really worth paying for a refin since the body's been routed.

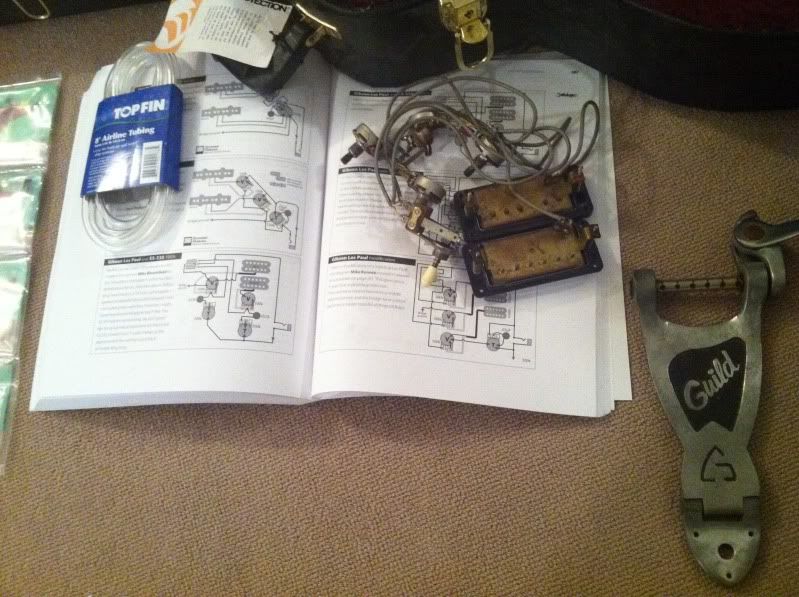
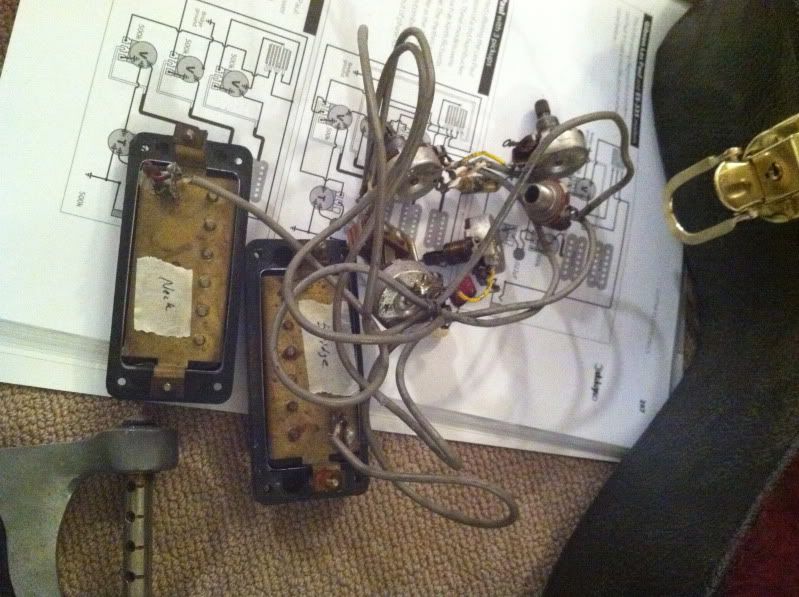
So there you go, probably another hundred or so bucks to get this thing into playing shape. The frets are like fretless wonders, jumbo and flat. I wonder how they'll do, no way to know until i string it up. Well there's a bonus, which is an original '67 Starfire IV harness - pots, switch, jack, all wired up to those HB-1s. I desoldered the pickups and put them on the VI's harness. Off to tap test it now at least.
 

Jahn

Senior Member
Joined
Feb 1, 2007
Messages
1,932
Reaction score
64
Location
NYC
Ok so here's the blow by blow:

First come the prep parts. Things I didn't get - Bigsby Spring, Pickup selector nut, mounting screws for pickup rings. And the bridge posts are for a Nashville, so I think I'll pick up a Faber conversion post so I can put an ABR-sized Tru-Arc on there. Also need a bracket for the pickguard.

IMG_1276.jpg


Then come the two boxes. The first came with the pickups and mounting harness for a '67 Starfire IV, see the Mullard and WIMA caps. also the Bigsby and the pickguard (out of shot). I figure the closest diagram is for the 50s ES-335 wiring, so I determine the bridge and neck pickups from that and label with some tape.

IMG_1275.jpg


IMG_1279.jpg


Now comes the guitar. Already has its original harness mounted, but no idea if it's functional. I really should solder the pickups on first to test before installing, but oh well, don't really feel like soldering too much on those old turrets. That "oh well" will create headaches later...

IMG_1277.jpg


Time to wire it all up. Get my tubing out so I can fish all the parts to the holes, and the floss is to get the pickup wires through to the pickup cavities:

IMG_1280.jpg


Fish it all through, realize that the grounding wire for the bigsby doesn't quite poke through long enough so i kinda have a loose connection for that, really have to revisit for a more solid ground there. Also hold the pickup selector in place with floss until I get that knurled nut ordered:

IMG_1281.jpg


I solder the pickups on. This is when I realize two things - that the neck cavity was badly routed to be big enough for a full bucker, meaning that you can see the gap even when the original pickup and ring are installed - and the bridge pickup seems to ride too tall in the cavity - was a '67 Starfire's bridge cavity deeper than a '65? Anyhow this means I'll have to get shorter pickup adjustment screws for the bridge pickup and longer mounting ring screws for the bridge.

IMG_1286.jpg


Well I guess from arm's length you can't really tell all that so I guess it's ok. I think an aluminum bar bridge on fixed studs might be nice for this thing, but I want to get the wiring sussed out first before I spend any extra cash - maybe it's my bad soldering job, but first the bridge then the neck shorted out. I figured out that the grounding and live wires were touching in the bridge - i separated those and now that pickup's fine. But now the neck pickup is dead and I can't figure out why - but it was working before so I know it's not really dead. Maybe a resoldering is in order?

IMG_1285.jpg


Well anyhow that's as far as I could take it in one night, or as I like to put it, 6 and a half hours until 4:30AM in the morning with a long Friday's work ahead of me. Ugh! Would have been nice if the payoff was instant, but with missing parts and a funky wiring prob it's just not to be. Oh well, may not be instant gratification but I think I can make this happen!

IMG_1287.jpg
 

Jahn

Senior Member
Joined
Feb 1, 2007
Messages
1,932
Reaction score
64
Location
NYC
http://www.truarcbridgeworks.com/

Just ordered a 12" Radius AL-120 Aluminum Rocking Bridge from Tru-Arc, and I'm going to pull those Nashville studs out tonight. Tru-Arc will also provide an ebony gretsch bridge with nickel studs, I think that'll look classy with the ebony fretboard. Somewhere down the line i'll get nickel grovers, but that's after i get everything else straight.

Just ordered a pickup selector nut and a long spring for the Bigsby. Coming along now. I think I'll swing by the NYC shops and grab some pickup mounting ring screws - the ones that work for gibson also work for guilds, right?
 

Jahn

Senior Member
Joined
Feb 1, 2007
Messages
1,932
Reaction score
64
Location
NYC
Very upset that my crap soldering skills may have screwed with vintage original electronics, so i busted out another 25 bucks to get a "third hand" clipping station, a solder tip cleaner and holder, a solder sucker and a digital multimeter so i can check my progress as i solder along. amazon has some nice cyber deals going on all week so i got most 40-60 percent off.

I contacted these guys to source the right pickup screws, and for trussrod screws too.

http://www.theguitarmechanic.com/HB1.html

do you all know if the turret board on the pickup falls off, if i need to solder it back on the baseplate for any reason? it's still attached by the wires, and i don't have the skills to solder it back on without getting too close to the skinny pickup wires/insulation. however if it's needed for grounding purposes i'll do it. plus, does a grounding wire need to go to the bridge pickup or something? i know 70s HB-1s do, but don't know about the 60s mini HB-1 ones.
 

kakerlak

Senior Member
Joined
Apr 6, 2009
Messages
2,354
Reaction score
128
Location
Oklahoma
Pretty guitar!

If you situate the neck pickup's mounting ring so the side closest to the fingerboard is just flush with the route (i.e. just to the point the route isn't visible from above), would the other side of it be sitting far enough towards the bridge to cover the extra routing? If so, I'd be inclined to go ahead and drill new mounting holes for the 4 corner screws and live with possibly visible screw holes at the neck side vs. visible route for the pickup. If not, and/or if you feel inclined, you could make a wider custom ring or just a thin sheet of black plastic to sit underneath the factory mounting ring to cover the route.

Your bridge pickup's height-adjust screws are non-original. Originals would be the pan head slotted ones like on the neck pickup. They're probably longer than stock and what's bottoming out.

Don't know about the pickup wiring terminal; it's been too long since I've had a 60s Guild taken apart. I thought that terminal/tab was screwed onto the pickup base, rather than soldered, though. Either way, I'd be inclined to re-secure it; it's a worthwhile safeguard to prevent the thin wires coming out of the pickup from bearing the weight of the rest of the harness and possibly becoming severed internally or breaking off at the solder points.

Good progress though and smart idea moving to chrome parts. You can probably eBay the '60s gold Grovers for more than a new set of chrome ones. You'd have been looking for ages for gold parts, especially when the gold Guildsby is an SF-VI-only part and gold mini-HB1s were probably only SF-VI and X-500 equipment.
 

Jahn

Senior Member
Joined
Feb 1, 2007
Messages
1,932
Reaction score
64
Location
NYC
actually those gold grovers on there are recent chinese locking rotos it turns out. no biggie but oh well.

yep i thought about drilling new holes for the neck pickup too, i'll leave that idea for last until everything else is solid. i just hate to drill more holes - not that being full of holes is a big deal on this one right now, hah!

speaking of which, i up and took out the nashville studs, here's a miniblog about the process:

http://thegenerationofmusic.wordpress.c ... r-2-bucks/

and i will indeed solder the turret board back on the base once my soldering stuff comes in, maybe give it another resoldering try if all that doesn't revive the neck pickup.

agreed about the bridge height screws not being right - going to toss those once right ones or at least right length ones can be sourced.
 

coastie99

Enlightened Member
Joined
Jan 1, 2006
Messages
8,662
Reaction score
27
Location
Greymouth, West Coast, Newsyland
A very worthy project Jahn and congratulations on the DIY approach.

What sort of soldering gear have you got in-bound ?

I'm thinking that you're going to have a pig of a job soldering those little boards onto the backs of the pickups. The pickup's gonna act like one big heatsink.
 

Jahn

Senior Member
Joined
Feb 1, 2007
Messages
1,932
Reaction score
64
Location
NYC
coastie99 said:
A very worthy project Jahn and congratulations on the DIY approach.

What sort of soldering gear have you got in-bound ?

I'm thinking that you're going to have a pig of a job soldering those little boards onto the backs of the pickups. The pickup's gonna act like one big heatsink.


Right now I have a pencil weller and some solder, that's it. I got the helpin hand clip station coming to help keep the turret still, and I have a brass wool top cleaner/stand coming so I can work quicker inbetween solders. Also have a multimeter coming so I can test the pickup as I go along. Oh, and a solder sucker for when my massive pools of solder fail to secure the turret at first.
 

Jahn

Senior Member
Joined
Feb 1, 2007
Messages
1,932
Reaction score
64
Location
NYC
New update - I went rooting through my parts bin and I found 4 slot screws. Two were shorter than the others, so I used those for the bridge height adjustment screws. Worked great, the pickup now was flush in the pocket instead of the bracket being shorter than the screws. I used the other two screws to temporarily secure the ring to the body, eventually I'll get some phillip heads in there.

Untitled.png


The trussrod cover doesn't seem to be right, as it's a stamped metal badge? But the bigger problem is the trussrod - no flat cover will fit over it because the nut is larger than the hole that it's in, so it sticks out over the headstock. Also, there's some ugly refin bubbling or something around there, but oh well. Now I'm just thinking how I'm going to screw something over the rod hole without it rattling against the nut - even louder if i use the metal cover.

Untitled2.png


I think I can source the right trussroad screws tho, we'll see. The project soldiers on!
 

Jahn

Senior Member
Joined
Feb 1, 2007
Messages
1,932
Reaction score
64
Location
NYC
Well I ordered an aluminum bigbsy bridge, my thinking is that i can ground my pickups by putting one wire under the bridge pickup, and the other under the base of the bigsby bridge. That way the ground can go through the bridge, touch the strings that are already touching the Bigsby vibrato that is touching my grounding wire in the endpin, and bingo ground loop complete. just a little unobtrusive copper wire popping out from under the bridge ring tucked under the bigsby base should do it.

And I also noticed that the hum was gone when my selector switch was positioned right, instead of drooping in the hole. So the nut to secure it is coming too. Let's see, last is that bigsby spring, extra tall, shipped to me today - get some good warble going on for it.

After the bridge and spring is on, at least with the bridge pickup I'll be able to string it up and play it like a real guitar. I'll suss out the neck when the solder stuff comes. But I have a feeling this thing will eventually need a pro setup once i'm done - set the neck relief, hopefully the trussrod isn't frozen or the neck isn't warped, who knows how long it's been since a set of strings has been on here, so on and so on. We'll see once we get the major stuff up and running.
 

Default

Super Moderator
Platinum Supporting
Joined
Jul 30, 2007
Messages
13,656
Reaction score
3,086
Location
Philly, or thereabouts
Guild Total
11
Confused about the ground wiring. If the wire is shielded, the braid is soldered to the pup cover, either directly or on the terminal that's screwed to the bottom of the pup. The braid is supposed to be soldered to each pot and then to the ground lug on the jack. The string ground is provided by the wire to the Bigsby.

So, why do you need a wire to the bridge, if you are getting the same connection via the Bigsby?

What did I miss???
 

Jahn

Senior Member
Joined
Feb 1, 2007
Messages
1,932
Reaction score
64
Location
NYC
You got me! I was getting nasty hum until I actually laid the string right on the bridge pickup, and bingo, no hum. I'm going to see what locking the selector switch in place will do, maybe there's a loose solder for the ground in there that's making it ground and unground depending on how I'm fiddling with the selector switch? It's really annoying, but I'm no electrician genius!

Another thing I noticed - the pickguard that came with the VI doesn't have any spaces cut out on the pickup side to accomodate either the neck or bridge mounting rings or screws, so I'm guessing it's a repro or an unused original, which would be uncommon. Either way, the guard's going to need to be cut for the VI, so in that case I'll leave that up to the place that I'll have the final setup done - bracket and mount a cut guard that is. I had luck with Main Drag Music in Williamsburg doing such stuff for my old Country Gent, so I may take it there - but try to do as much on my own as possible until I can't screw it up any further on my own!

Edit - just got notice that my soldering stuff arrived today. So when I get home, it's sweat time...
 

kakerlak

Senior Member
Joined
Apr 6, 2009
Messages
2,354
Reaction score
128
Location
Oklahoma
If the pickguard you have is cut out for the pickups (but not the mounting rings or height-adjust screws) then it's factory or factory-style.

Pretty much all Guild pickguards were cut to sit on top of the pickup rings, rather than around them, and the older ones were not notched for access to the pickup height adjust screws. Sitting on top of the rings puts the edge of the pickguard pretty close to the strings, which some players find a little annoying (myself included). That, in combination with having to remove it to get at the pickup adjustment screws, is probably why Starfire pickguards are missing at such a higher rate than say Gretsch or Gibson pickguards.
 

Jahn

Senior Member
Joined
Feb 1, 2007
Messages
1,932
Reaction score
64
Location
NYC
Ayep, this guard is a straight edge, no cutouts of any sort for pickups, rings, screws or anything else.

Well this is ridiculous, i thought it would be the other way around, but the period correct grovers are on ebay for 150 - but period correct for a VI, which means Gold. Uh, I'm trying to get away from that. Same guy has the "cheaper" nickel ones... for 200! Argh! Well I guess I have to pass, that's disappointing.
 

Jahn

Senior Member
Joined
Feb 1, 2007
Messages
1,932
Reaction score
64
Location
NYC
Soldering stuff came in, took the neck pickup off, you're right the tagboard won't stick on the baseplate since the plate won't get hot enough to keep that solder on there. Oh well, doesn't actually seem to affect the pickup. Put it back on there and still no neck pickup activation. Argh. Honestly I have no idea how to use this mutimeter, i tried to get a reading with it for various things and the meter jumped all around, oh well.

I think at this point i may have to just pull all the wiring out again and test each joint. arrrgghhhh. not fun!

Just realized this multimeter doesn't have a continuity checker. Horrible. Just ordered one that does, maybe I can isolate the issue that way.

Edit- just ordered a proper set of humbucking mounting screws, and a set of trussrod screws. Yeah that trussrod cover isn't right, but I might as well put something over it for now. Gave the nickel tuner seller a ring and we negotiated a fair price shipped hopefully by the end of the week. Things are coming together now!

And I realized that the trussrod cover actually may be period correct:

http://www.guitarchives.nl/guitarsgalor ... php?id=102

That's exactly what i have. Hmm.

Also realized that with the Bigsby bridge coming, I'm going to need to switch to a wound G, and a set of .11s instead of my normal .10s might help with bigsby stability too. I'm going to pick up some D'Addario EXL115W tonight.
 

Jahn

Senior Member
Joined
Feb 1, 2007
Messages
1,932
Reaction score
64
Location
NYC
So close and yet so far! My bigsby's bridge came, as did the nut for the selector switch. The nut even all the way screwed in lets the switch kinda rattle around a bit and you can lift it a bit - am i missing something, like a star washer on the inside or something? I know the pots have it, so maybe the selector switch needs it too? So for now I'm wedging a cardboard card (actually, Christmas card from the postman) in there so it'll be in the place where the bridge pickup activates. It's upsetting that the wiring has to be JUST RIGHT to get the signal to the bridge, and even then it hums, and the neck doesn't switch on at all anymore. I'm definitely waiting for that grounding tester to come so i can maybe pinpoint the problem.

But when I lowered the volume so you can't hear the hum, then turned up the amp so i got it to amp cooking levels, that bridge pickup has THAT GUILD SOUND. Man, I missed the sound of the Mini HB-1! Plus, a perfect amount of sympathetic resonance ringing out and very controllable feedback, almost melodic - you semi starfire guys know what I'm talking about! It's being run straight into a Fender Harvard - 6G10, so it's a beefy tweed princeton really. I can't wait until the Starfire is perfect, to really cut loose!

Good news is that with everything strung up, it doesn't seem like the neck is warped or needs a reset. Maybe a tweak of the trussrod eventually.

Anyhow here's a pic after my session with it tonight - SO CLOSE!

IMG_1331.jpg
 

Jahn

Senior Member
Joined
Feb 1, 2007
Messages
1,932
Reaction score
64
Location
NYC
Well i went online and it looks like i got the wrong knurled nut for the selector switch - i got the "deep nut" since it's a vintage switchcraft, but i guess it's not THAT vintage. So there's an incoming nut without the flange on the way, that should take care of the spacing issue.

Also ordered some vintage braided wire, those pickup leads are just too darn short so just in case i need to unsolder anything from the original pots, i'll put these longer pickup leads on there instead. again, i'm hoping the neck issue is a wiring solder thing and not an actual pickup dead thing. we'll see when the new multimeter comes.
 

Default

Super Moderator
Platinum Supporting
Joined
Jul 30, 2007
Messages
13,656
Reaction score
3,086
Location
Philly, or thereabouts
Guild Total
11
Aren't projects fun? And relaxing? Still, you're making progress and if the guitar plays well, the electronics will sort themselves out. Just out of curiosity, what resistance do those pots have? That is, if you have the harness out again.
 

Jahn

Senior Member
Joined
Feb 1, 2007
Messages
1,932
Reaction score
64
Location
NYC
If they come off again (and i feel the neck definitely will) i'll check for sure. the other multimeter i had jumped all over the place, all i could tell was that juice would go through it. honestly i probably wasn't even using it right, hah!

Oops i was talking about the pickups. for the pots don't you have to desolder everything attached to read the pots? not sure but i can try to read it if we ever get to naked pot level. pretty sure these are 500k pots tho.
 
Top